This comprehensive guide will walk you through the process of constructing a shed ramp, allowing for effortless removal of equipment such as lawnmowers from your shed. Typically, it is essential to build a ramp for a shed.
Assemble the decking for your shed ramp and connect the ledger board, joists, and bottom support brace together. Perform an angled cut on the end of the joists and establish the slope angle for the shed ramp. Trim the shed ramp joists to the appropriate length. Generally, the length of the shed ramp should be a multiple of the width of the decking boards. Decide the desired length for the shed ramp. Trim the ledger board and bottom support to the desired width and determine the desired width for constructing the shed ramp.
There are just a few “best practices” discussed in this article for building a ramp shed. There is no right or wrong way to build a ramp shed. If you go for it, there is a relatively easy project with low risk consequences if you get it wrong.
In order to effectively build a ramp for a shed, you will probably require the subsequent tools and materials:.
With all essential equipment and resources readily available, you can now commence constructing your shed ramp.
4. Establish your Shed Ramp Angle
The shed entrance and the outside grade, based on the height delta, must establish an appropriate shed ramp angle at this point.
When necessary, you can typically make slight modifications since you have the ability to dig outside the shed and make adjustments. It is generally satisfactory to visually approximate the angle, although there are methods to compute the ramp angle of the shed.
I suggest utilizing your miter saw to create a few “trial cuts” on various angles using some scrap pieces of lumber.
Observe the appearance, I suggest commencing with a 10 degree inclination if you anticipate not requiring a significant angle for your shed ramp.
If you expect to require a steeper incline, perhaps begin with a 20 degree angle.
“Dry-fit” the angle next to the shed to determine what modifications are required.
Adjust the angle as necessary for your specific shed ramp application.
After determining the suitable inclination for your shed ramp, make sure to trim the end of every joist to correspond with the necessary angle.
Once you have trimmed the required angle on the edge of your shed ramp joists, you can proceed to the following stage.
1. Determine Your Shed Ramp Width
The shed ramp width will typically be as wide as the opening of the shed door. The first step in constructing a shed ramp is to determine its width.
Take some time to think about the width of the opening of your shed when you bring in and take out equipment and tools of various types.
The dimensions of the shed ramp will dictate the dimensions of your ledger board and the reinforcing brace at the base – as depicted in the diagram provided.
Once you have determined the width of your shed ramp, you can then proceed to determine the length of your shed ramp.
2. Determine Your Shed Ramp Length
When choosing the length of your shed ramp, there are a couple of factors to consider. You should establish the length of your shed ramp once you have determined the width of your shed.
Simply choose the appropriate length ramp for your specific shed ramp application. There is no specific length ramp that is correct for your specific shed ramp application.
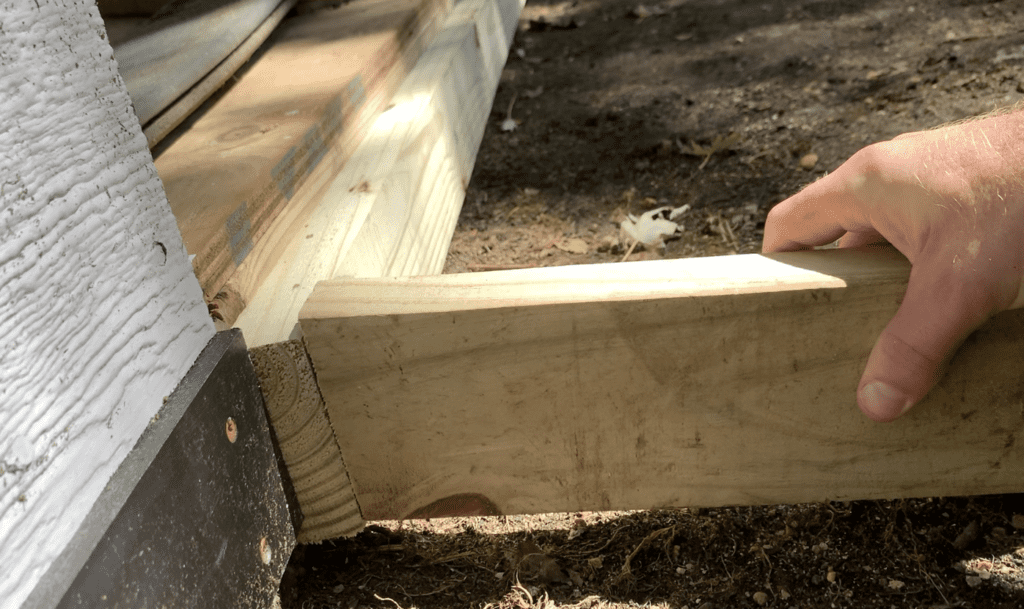
9. Attach Ledger Board to Shed
Connect the shed ramp ledger board to the shed as displayed beneath following the process of filling with stone and digging at the foundation of the shed ramp.
When setting up, ensure that the ledger board is even. Connect the shed ramp ledger board to the shed at different points using 3″ screws suitable for outdoor use.
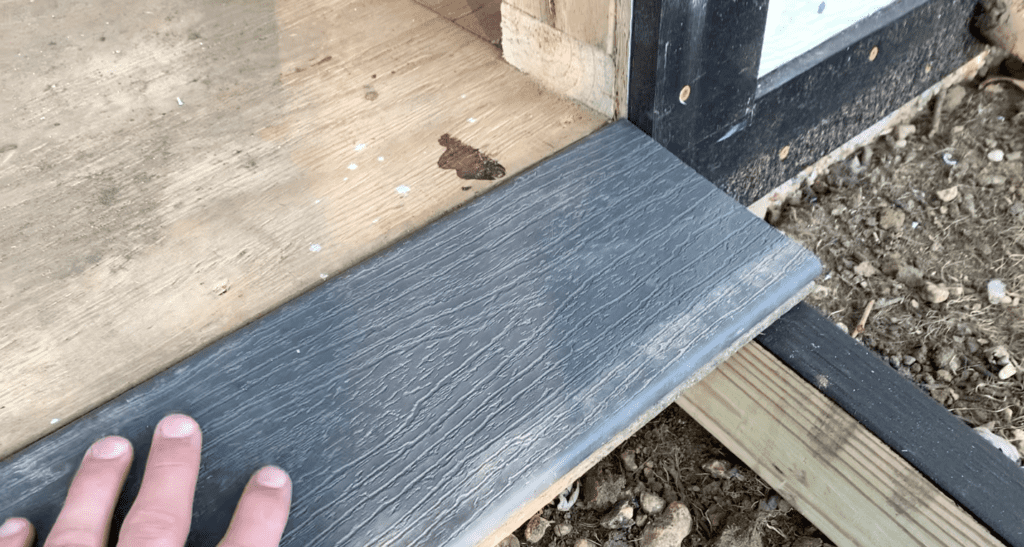
PRO TIP – Install the shed ramp ledger board at a height where the decking board will be perfectly flush with the shed subfloor – as shown below:
6. Attach all of the shed Ramp Components Together
Attach the shed ramp joists to the ledger board, as illustrated below, using 3″ screws suitable for outdoor use. Secure all the shed ramp elements together during this phase.
Then, secure the support brace at the base of the joists.
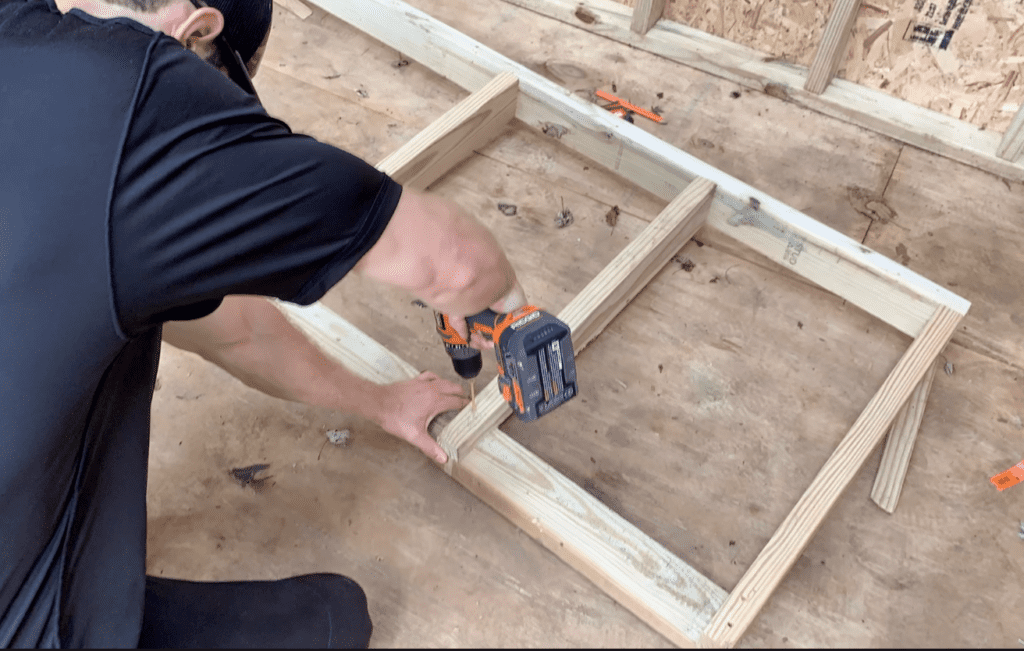
Make sure to evenly space the joists of the shed ramp.
Consider applying a waterproof sealer to the cut edges of the shed ramp to extend its usefulness and help protect it from moisture. It is also advisable to use tougher pieces of lumber when securing the edges of the shed ramp.
7. Dry Fit the Shed Ramp in Place and Excavate as Necessary
Position the ledger board of the shed ramp adjacent to the shed and observe the appearance of the shed ramp in its current position.
To achieve a level shed ramp, you will have to dig around the foundation of the shed ramp. It is probable.
Make modifications as necessary until the ledger board fits snugly against the shed.
5. Match your Shed Ramp Angle on the Bottom Support Brace
After determining the angle of the shed ramp, you will need to cut the support brace at the bottom and match it to the angle of the side board ledger on the joists, making an angled cut.
To do this, use a carpenters square to mark the same angle that was used at the front end of the joist.
The goal is to cut the bottom of the shed ramp joist in such a way that it will sit flat on the ground once positioned in place, with the angle shown below being circular sawed. Remember to position it appropriately.
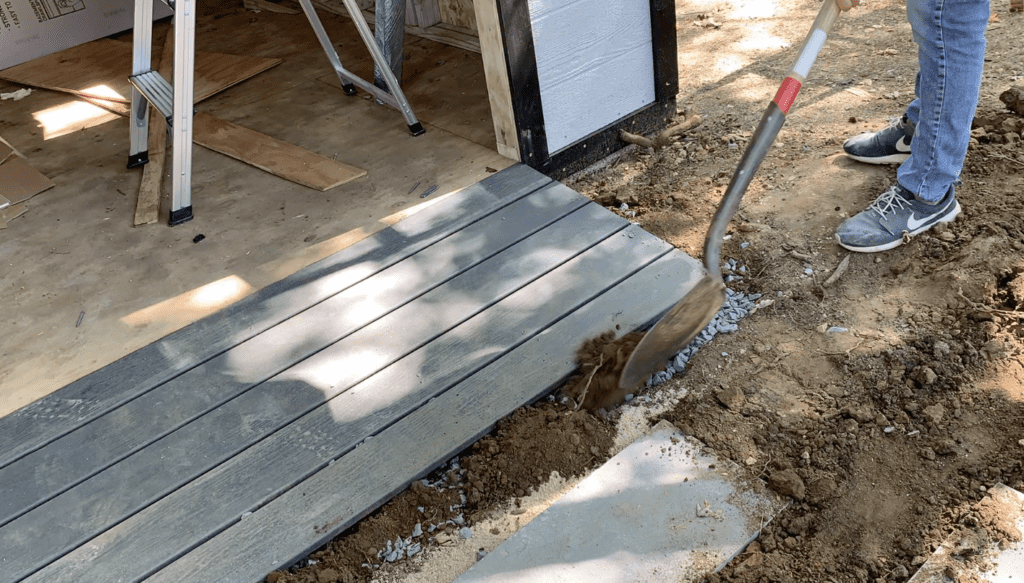
8. Apply Stone Beneath the Shed Ramp
For optimal placement of the shed ramp, it is commonly recommended to dig an extra 2″ when excavating around the base of the ramp, in order to accommodate a layer of 2″ stones.
By applying stone to the base of the shed ramp, you will prevent premature rotting of the lumber and facilitate drainage where it comes into contact with the ground.
Additionally, the layer of stones will facilitate the process of leveling the ramp for the shed.
11. Attach Shed Ramp Decking Boards
Once you have leveled the entire shed ramp and attached the shed ramp ledger board to the shed, you may commence with the installation of your shed ramp decking boards.
Typically, when selecting decking boards for the specific installation of your desired ramp shed, it is common to use pressure-treated 2″x6″ lumber or composite decking boards for the ramp shed.
Place them at a right angle to the joists of the shed ramp and trim the boards for your shed ramp decking to match the same length as your shed ramp (or slightly bigger to accommodate a 1/2″ overhang).
Fasten the decking boards at every joist position using two fasteners. Make sure there is consistent spacing between each decking board.
Once you have affixed all the decking boards to the frame of the shed ramp, your project is almost finished.
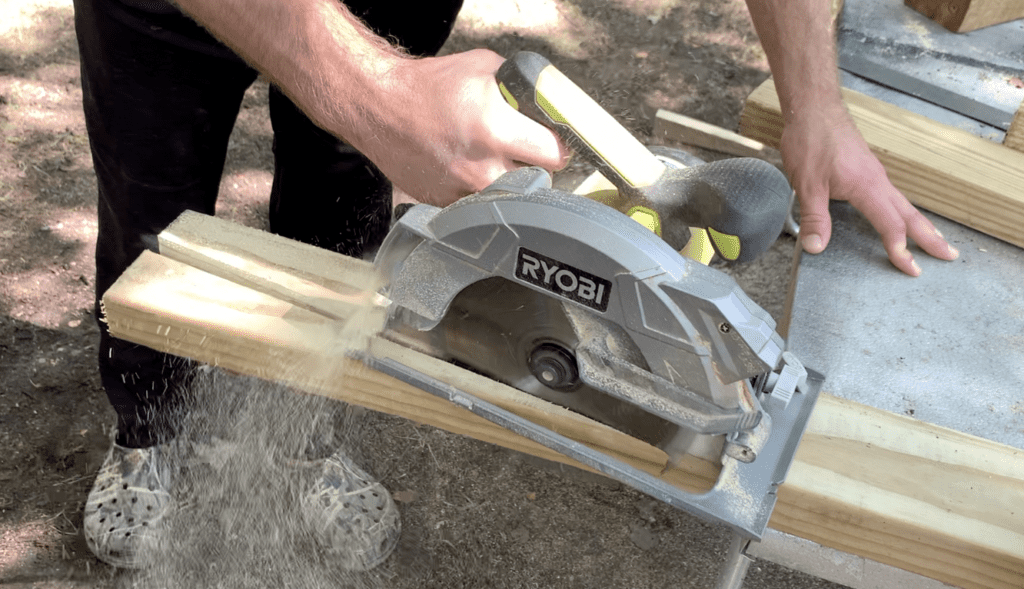
3. Cut your Ledger Board, Joists, and Bottom Support Braces to Length
After selecting the desired width and length for your Shed Ramp, you may then proceed to cut your ledger board, joists, and bottom support brace to the suitable measurements.
All of your shed ramp joists will have the identical size. Moreover, your ledger board and bottom support brace will also be of the same length.
As demonstrated beneath, a total of 5 beams would be necessary for a shed ramp that is 6 feet in width. It is advisable to trim an adequate number of shed ramp beams to ensure a maximum gap of 16 inches between them.
In order to trim the shed ramp, you need to determine the required slope of the shed ramp beam after trimming the shed ramp components to their proper measurements.
10. Level the Shed Ramp
After securing the shed ramp ledger board to the shed, verify that all of the shed ramp joists are completely horizontal.
Position a level on top of the shed ramp joists and make necessary adjustments until the shed ramp is perfectly level.
To make modifications, include or eliminate rocks from the foundation of the shed slope until the desired elevation is attained.
12. Backfill Around the Shed Ramp
The final stage in the construction process of the shed ramp is to fill in the area surrounding the shed ramp.
Fill in the gaps around the shed ramp as necessary to align with the nearby slope.
Plant turf seed or design the surroundings of the shed ramp as desired.
At this point, you have successfully finished your shed ramp building project.
If you want to learn how to build a Modern Shed, the “Course Shed Modern a Build to How” includes step-by-step video instructions and detailed lists for each step of the project, including cutting lumber, tools, and materials. You can find it linked here.
For more information on how to build a Modern Shed 10’x10′, check out my step-by-step tutorial videos on Youtube.
Thanks!
Thanks so much for checking out ATImprovements! If you learned something from this project, you might also like these other DIY Projects:.
Thanks!